To install the plugin CSDN you only need a few minutes and no external data: you upload the zip file, activate it, and local protection starts on its own. In this chapter you will see the steps, what happens on activation and what to check on first run.
Where it is
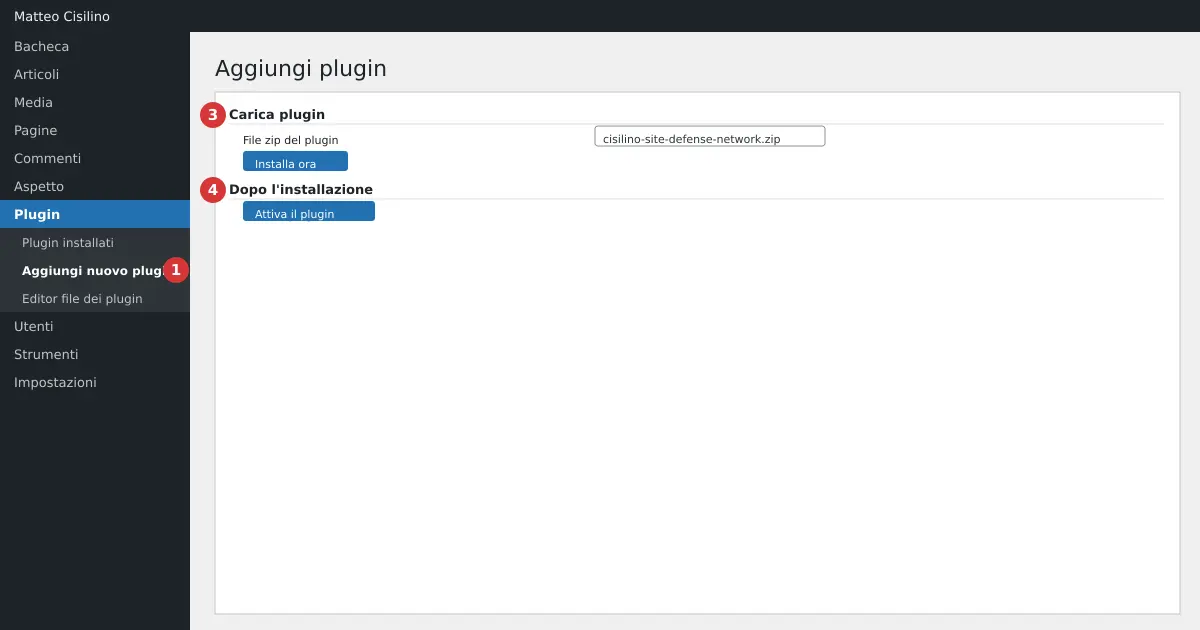
Everything starts from the Plugins item in the WordPress side menu, point 1 in the image. From there open Add New Plugin.
How to install the plugin
Before you begin, back up your site. The plugin writes to the .htaccess file and does not make a copy of it, so the caution is up to you.
- In the side menu go to Plugins and then Add New Plugin.
- Press Upload Plugin.
- At point 3 in the image, under Plugin zip file, choose the plugin’s zip file, for example
cisilino-site-defense-network-1.0.15.zip. - Press Install Now.
- At point 4 in the image, once installation is finished, press Activate Plugin.
As an alternative you can copy the plugin folder into /wp-content/plugins/ via FTP. Then activate it from Plugins > Installed Plugins. The result is the same either way.
What happens on activation
The plugin prepares everything it needs on its own.
- It creates four database tables, with your site’s prefix:
csdn_events,csdn_overrides,csdn_rate_hitsandcsdn_activity. - It prepares the two marked blocks in
.htaccess, one for blocked IPs and one for hardening. On first activation they are empty. - It registers three scheduled WordPress tasks: synchronisation every 15 minutes, the daily log cleanup and the daily integrity check.
- It takes a snapshot of the hashes of the plugin’s PHP files, used later by the integrity check.
The scheduled tasks use WP-Cron. It runs when the site receives visits, unless your hosting uses a system cron instead.
First run
As soon as you finish installing the plugin, open Settings > Cisilino Site Defense Network. The General tab opens. At the top you will see a row with three counters: locally blocked IPs, those received from the panel, and those from the optional security list. Right after installation they are all at zero.
Once you install the plugin you don’t need to configure anything to be protected. Here’s what is already active with the default values:
- Detection of failed logins, with a block threshold of 10.
- The registration policy “Low-privilege roles only”.
- Rate limiting for authors and for guests, and the mandatory email address when creating users.
- The activity log, with 30 days’ retention and a cap of 500 rows.
- Logging of file uploads. Blocking them, on the other hand, is switched off.
All the hardening rules, the security headers, the inactivity logout and the debug log are off by default. You switch them on yourself, one at a time, in the dedicated chapters.
Three checks to do right away
- In the General tab, in the Trusted IPs (whitelist) section, press Add to whitelist if you see the box “Your current IP (…) is not in the whitelist.”. This way your own password mistakes won’t count against you.
- Look at the value under IP address in the Local IP overrides section: the field is pre-filled with your IP. Do not press Save override with “Block (ban)” selected, or you’ll lock yourself out.
- Scroll through the ten tabs and read the introductory text. The other chapters of this manual tell you what each one does.
Warning: the failed-login counter is cumulative and never expires. Even a legitimate user who occasionally mistypes a password can reach the threshold. Put your trusted networks in the whitelist.
Default values and limits
- The plugin only appears on the Settings page for whoever has the right permission. Anyone without it won’t see the page; if they try to open an action they get “Not authorised.”.
- On a multisite network, the page is reserved for the super admin, because
.htaccessbelongs to the network. Connect only one site per network to the panel. - If
.htaccessis not writable, the site keeps working, but the server-level rules are not applied. - The plugin reads the visitor’s IP only from
REMOTE_ADDRand ignores headers such as X-Forwarded-For. If the site sits behind a proxy or a CDN, every visitor can appear to share the proxy’s IP: before relying on the blocks, check that the address shown in Your current IP really is yours.
What happens behind the scenes
After an update, the plugin compares the database version with the current one. If they differ, it updates the tables and retakes the file snapshot, so the update doesn’t look like tampering. You don’t need to reactivate the plugin.
For the basics of installing a plugin in WordPress, the official guide to managing plugins also explains installation via FTP and the difference between deactivating and deleting.
If something goes wrong
If you can’t manage to install the plugin, check that you chose the right zip file and that your user is allowed to install plugins. If you get a server error after activation, go to the chapter Troubleshooting and frequently asked questions.
Previous chapter: the introduction to the manual. Next chapter: Connecting the plugin to the panel: Remote settings.


Leave a Reply