This CSDN manual explains how to use Cisilino Site Defense Network, a WordPress plugin that protects your site from abusive login attempts. I have written it for anyone who manages a site and wants to understand what each tab does before touching it. Here I describe version 1.0.15.
What is Cisilino Site Defense Network
Cisilino Site Defense Network, CSDN for short, is a WordPress plugin. It counts failed logins for each IP address. When an IP reaches the threshold, it blocks it by writing it into the site’s .htaccess file.
The plugin works on its own, with no configuration at all. Connecting it to an external panel is optional. If you don’t configure that connection, the plugin makes no outbound calls whatsoever.
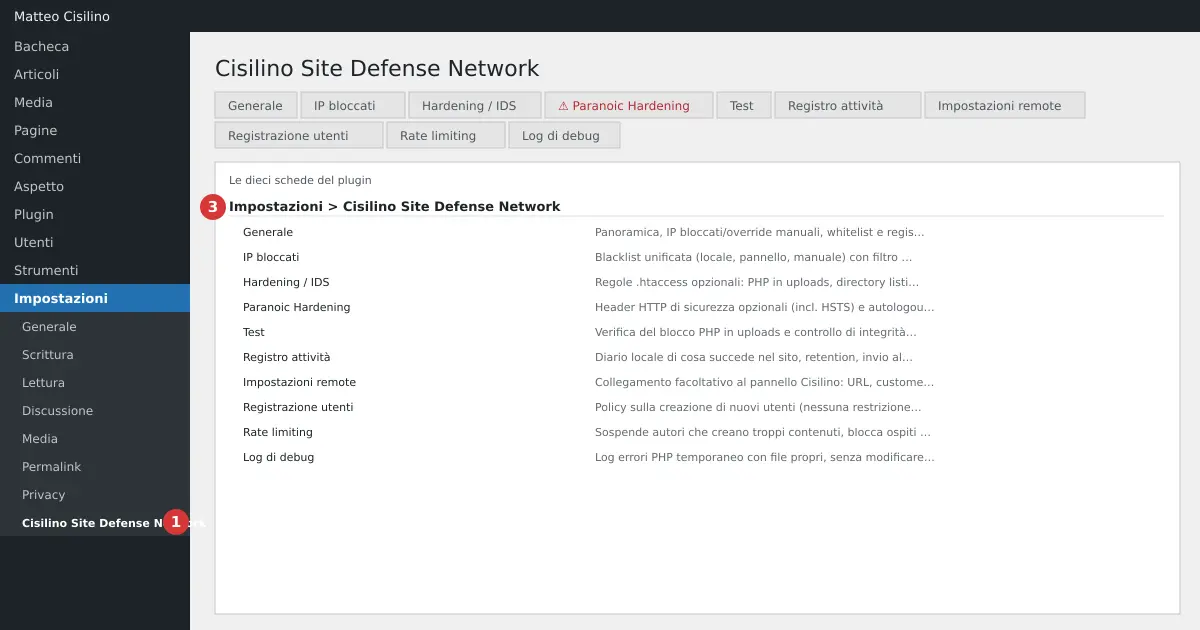
You will find it in the WordPress side menu, at the item marked by point 1 in the image: Settings > Cisilino Site Defense Network. Inside are ten tabs, listed at point 3.
What it does
The plugin brings together several defences, all managed from that one page.
- Automatic blocking of IPs that fail the login too many times, with a whitelist for trusted networks.
- Manual blocking and unblocking of a single IP, even for a set time.
- Optional rules for
.htaccess: no PHP inuploads, no directory listing, sensitive files protected. - Security HTTP headers and automatic logout of inactive administrators.
- A policy on who can create new users.
- A limit on authors’ publishing, and on comments and Contact Form 7 submissions from guests.
- A log of the site’s activity and an integrity check of the plugin’s files.
- A PHP error log, which you can switch on when you need it.
What the plugin doesn’t do
This CSDN manual also covers the plugin’s limits, and it’s worth knowing them straight away. The plugin is not a web application firewall: it doesn’t analyse the content of requests. The word IDS in the tab name refers to file and folder access rules, not a genuine intrusion detection system.
- It doesn’t prevent file tampering: it only detects it, and anyone who already has write access can bypass the check.
- It doesn’t make a copy of
.htaccessbefore changing it. - It doesn’t offer a Content-Security-Policy header.
- It doesn’t hide the user list exposed by the WordPress REST API.
- It has no list of email domains and no captcha for registrations.
- On a server that ignores
.htaccess, such as nginx, the server-level rules have no effect.
Warning: a plugin reduces risk, it doesn’t eliminate it. Keep WordPress, themes and plugins up to date, and back up your site, even if you use CSDN.
Requirements
- WordPress 5.8 or later, and PHP 7.4 or later.
- Apache, or a compatible LiteSpeed, for IP blocking and hardening. The
.htaccessfile must be writable. - An account with permission to manage settings. On a single site this is
manage_options. On a multisite network you need the super admin. - For the panel, optional: an https address, a customer code and an API key.
Updates arrive through WordPress’s normal mechanism, under Plugins > Updates. The plugin is built for the WordPress.org directory, where it has its official page: that’s the right place to check which version is published.
How to read the CSDN manual
You can read the chapters in order or jump straight to the one you need. Every chapter has an image with a map of the page and numbered red circles: number 1 marks the menu item, 2 the active tab, and the rest mark the sections.
If this is your first time, start with installation and the first run. If something isn’t working, go straight to the troubleshooting chapter. These are the chapters:
- Introduction: this page.
- Installing and activating Cisilino Site Defense Network
- Connecting the plugin to the panel: Remote settings
- General tab: block threshold and plugin status
- Blocking, unblocking and whitelisting: the manual overrides
- Blocked IPs tab: reading the blacklist
- Hardening / IDS: the rules for .htaccess
- Upload monitoring and the integrity check
- Test tab: checking that the protections work
- Paranoic Hardening: security headers and the admin session
- User registration: who can create accounts
- Rate limiting: limits on authors and visitors
- Activity log: what happened on the site
- Debug log: PHP errors in their own file
- Troubleshooting and frequently asked questions
- Deactivation, uninstallation and personal data
One note to avoid confusion. Manually blocking and unblocking an IP, and the whitelist, live in the General tab, not in Blocked IPs. The same applies to the upload monitoring form.
All the field and button labels throughout this CSDN manual are copied exactly as you see them in the plugin. To get started, move on to the next chapter: Installing and activating Cisilino Site Defense Network.


Leave a Reply