The remote settings connect the plugin to the Cisilino panel. The connection is optional: without it the plugin still protects your site. In this chapter you will see how to fill in the tab, what travels to the panel, and what you must avoid.
Where it is
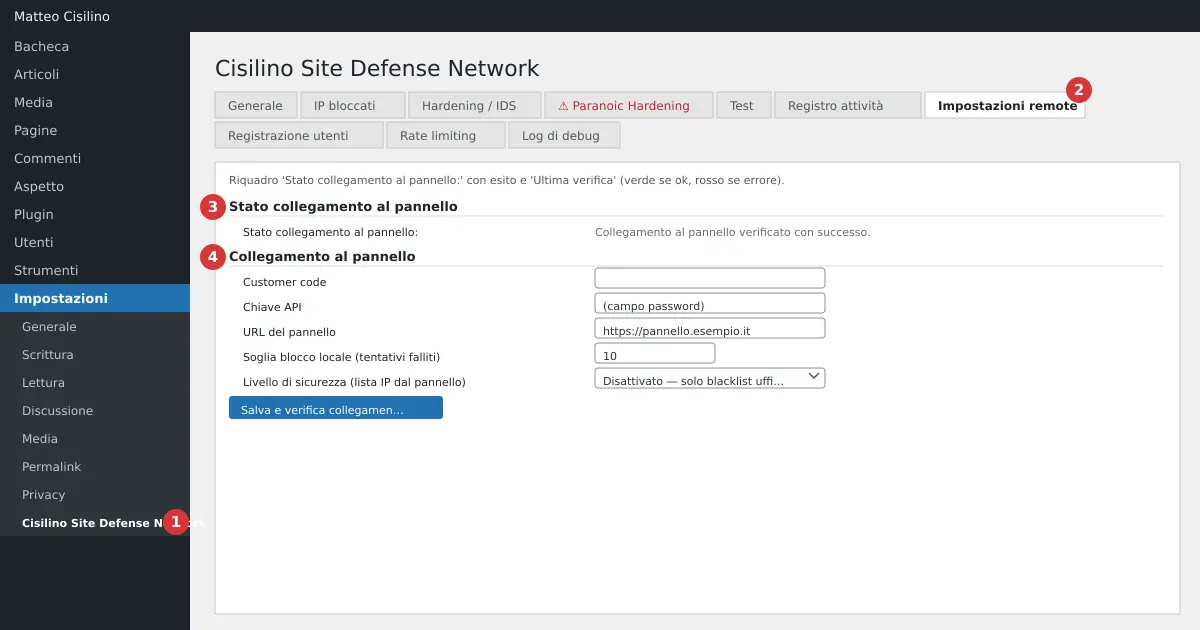
In the WordPress side bar open Settings and then “Cisilino Site Defense Network” (point 1 in the image). Click the “Remote settings” tab (point 2). Below it you’ll find two sections: the “Panel connection status” box (point 3) and the “Panel connection” form (point 4).
What it’s for
The plugin counts failed logins and blocks IPs locally, in the .htaccess file. If you connect it to the panel, every 15 minutes it sends the panel the IPs that have failed a login. In return it receives the list of IPs already banned for your customer account and blocks them on your site too.
If you leave the remote settings empty, the plugin makes no external calls at all. It keeps counting attempts and blocking IPs on the site. The diagram of its protections is in chapter 1, the index of the manual.
How to fill in the remote settings
- In the panel, open Settings › Audit Services and look for the “API keys — Cisilino Site Defense Network” section. This is where the panel generates the key.
- Go back to WordPress, to the section at point 4. Fill in “Customer code”.
- Paste the “API key”. The field is a password field: you won’t see what you type.
- Write the “Panel URL”, for example
https://panel.example.com. - Set, if you want, the “Local block threshold (failed attempts)”. I cover this in chapter 4.
- Choose the “Security level (IP list from the panel)”.
- Click “Save and verify connection”.
The settings are always saved, even if the check then fails. The exception is an http URL, which blocks the entire save (see below). You don’t have to rewrite everything to fix a typo. The result of the check appears in the box at point 3, labelled “Last check” together with the date. It is green if everything is fine, red if something is wrong.
The security levels
The “Security level (IP list from the panel)” field offers four options.
- “Disabled — official panel blacklist only” is the default value.
- “Noob — IPs seen failing WordPress logins elsewhere on the network”.
- “Casual — also IPs seen failing on FTP elsewhere on the network”.
- “Berserk — every IP logged as a possible attack, on any protocol”.
The levels get progressively wider: Noob is included in Casual, and Casual is included in Berserk. The panel sends every list, but the plugin only applies the one you choose. If you go back to “Disabled”, the previous list leaves .htaccess straight away.
Default values and limits
- Customer code and API key are empty at the start.
- The threshold is 10, with a minimum of 3 and a maximum of 100 only in the form field: the server doesn’t enforce the limits (an empty value or 0 becomes 10, and a forced value from 1 to 2 or above 100 would be accepted).
- The security level is “Disabled”.
- If even one of customer code, key or URL is missing, the plugin sends nothing and the status box disappears.
Why https is required
In the remote settings the panel URL must start with https. The API key travels in the body of every synchronisation request. Over http anyone on the network path could read it. They could also alter the response, which decides which IPs to block. To understand what the protocol guarantees you can read this page on HTTPS in the MDN glossary, which clearly explains traffic encryption.
A URL with no scheme (for example panel.example.com) is completed with http and therefore rejected: always write https://. The check happens twice. If you write an http URL, the plugin saves nothing at all (not even the other fields) and shows a red warning beginning with “Panel URL not saved: https is required”. The check repeats on every request: if an http URL were already saved, the request would not go out and the status would turn to error, with the message “Panel URL not secure: https is required”. The only exception is a local development host, such as localhost or a domain ending in .test, .localhost or .local.
Warning: never write the API key into an http URL, and never paste it into tools you don’t know. The key stays in clear text in the WordPress database: protect access to the backend too.
What gets sent to the panel
Once the remote settings are saved, on every synchronisation the plugin sends the panel:
- the customer code, the API key and the site’s address;
- up to 200 events at a time, each with the IP, the last username tried, the outcome (always “failed”) and the time of the attempt;
- the rows of the site’s activity log (the “Activity log” tab), in batches of 200: who performed the action (login, role, IP), the type of action and the description. This happens if “Send activity to the panel” is on, which it is by default. Sending also happens at the end of each request, not only every 15 minutes.
It never sends the password that was typed. Nor does it send the local overrides: these are described in chapter 5 and stay only on your site. Rows that have been sent are marked and are not sent again.
If something goes wrong
If the remote settings don’t work, the red box shows one of these messages.
- “Authentication rejected by the panel: customer_code or API key incorrect.” If the panel sends its own error message, that appears instead. Double-check both values.
- “Unable to reach the panel: …”, followed by the error text. Check the URL, the DNS and the certificate.
- “The panel replied with an error (HTTP …)”, followed by the start of the response.
- “Invalid response from the panel (not JSON).” The URL is probably not the right one.
If the panel doesn’t respond, the plugin doesn’t lose its protection. The IPs already blocked stay in the .htaccess file. The events stay queued and are resent on the next round. There is no warning email: you only read the status in the box.
Warning: the Casual and especially the Berserk levels block many IPs at once. Start from “Disabled” or Noob and move to a wider level only if you need to.
Remember: the remote settings are optional, and the plugin protects your site even without them.
Previous chapter: Installing and activating Cisilino Site Defense Network. Next chapter: General tab: block threshold and plugin status.


Leave a Reply