To block IP WordPress by hand, or to free an address stopped by mistake, the Cisilino Site Defense Network plugin gives you two tools. These are local overrides and the whitelist. Both live in the General tab, not in the “Blocked IPs” tab. This chapter explains how to use them without locking yourself out of your own site.
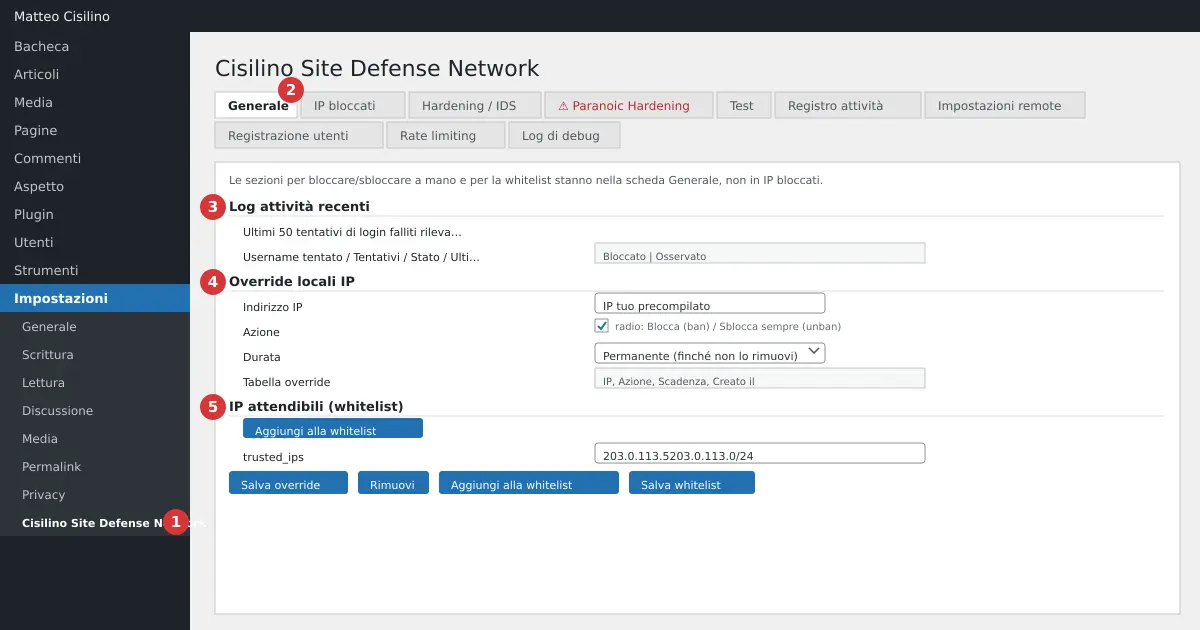
Where it is
In the WordPress side menu open Settings > Cisilino Site Defense Network (point 1 in the image). Then choose the General tab (point 2). Further down you’ll find three sections:
- point 3: “Recent activity log”.
- point 4: “Local IP overrides”.
- point 5: “Trusted IPs (whitelist)”.
After every action you’re always taken back to the General tab, even if you started from the “Blocked IPs” tab. The confirmation message appears there.
What it’s for
Overrides let you force the blocking or unblocking of a single address. This works regardless of the failed-attempts threshold and the list received from the panel. They apply only to this site: they are never sent to the panel.
The whitelist serves a different purpose. It lists the addresses that must never be counted as failed login attempts, for example your office network.
How to use it
Reading the log (point 3)
The “Recent activity log” section shows the “Last 50 failed login attempts detected on this site.” The columns are IP, Username tried, Attempts, Status and Last seen. The status is “Blocked” or “Watched”. There is one row for each IP, with a cumulative counter. The username shown is the last one that was tried. If there’s nothing you’ll read “No events recorded.” Don’t confuse this list with the “Activity log” tab: that’s a separate topic.
Blocking or unblocking an IP (point 4)
This is the part you need in order to block IP WordPress by hand.
- In the “IP address” field write a single address, for example
203.0.113.5. - Under “Action” choose “Block (ban)” or “Always unblock (unban)”.
- Under “Duration” choose “Permanent (until you remove it)”, “1 hour”, “6 hours”, “24 hours” or “7 days”.
- Press “Save override”. If the IP is valid you’ll read “Override saved and .htaccess updated.” The message appears even if .htaccess isn’t writable: it doesn’t prove the block is active.
Below the form is the table of active overrides, with the columns IP, Action, Expiry and Created on. Each row has a “Remove” button. Removing an override shows a confirmation that .htaccess was updated. If the table is empty you’ll find “No active overrides.”
Using the whitelist (point 5)
- In the box write one address or network per line, for example
203.0.113.5or203.0.113.0/24. - Press “Save whitelist”. You’ll read “Whitelist saved.”
If your IP isn’t in the list, a warning tells you so. The “Add to whitelist” button inserts only that entry and leaves the others untouched.
Default values and limits
- The default action is “Block (ban)”, and the default duration is “Permanent (until you remove it)”.
- The “IP address” field accepts only a single IPv4 or IPv6 address. A CIDR such as
203.0.113.0/24is rejected with “Invalid IP.” - Each IP can have only one override. If you save a second one for the same address, it replaces the first.
- The whitelist accepts single IPs and IPv4 CIDR networks with a prefix from 0 to 32. Watch out:
0.0.0.0/0is accepted and covers every IPv4 address, so it switches off failed-login counting for everyone. For IPv6 only the exact address is valid. - Invalid rows in the whitelist are discarded, and the message tells you how many, for example “1 row discarded because it is invalid.” Duplicates are removed.
- Saving the whitelist replaces the entire previous list.
Warning: the “IP address” field is already filled in with your own IP, and below it you’ll read “Your current IP is …”. The default action is “Block (ban)”. If you press “Save override” without looking, you block yourself, immediately, and you’ll see a 403 error on the whole site. Always check the action and the address before saving.
Warning: the “Unblock” button on the “Blocked IPs” tab asks for no confirmation. It immediately creates a permanent override. The whitelist doesn’t remove existing blocks: an IP that’s already blocked stays blocked even if you add it to the list, until you unblock it. It doesn’t stop the panel’s blocks, the security list or the manual bans either: it only stops failed logins from being counted. Blocking also only works with Apache or LiteSpeed, and with a writable .htaccess file. With other servers the ban exists in the tables, but the server doesn’t apply it.
What happens behind the scenes
When you decide to block IP WordPress with an override, the plugin rewrites a block of .htaccess between # BEGIN Cisilino Site Defense Network and # END Cisilino Site Defense Network. The rest of the file is left untouched. The blocked IPs are the union of four sources: the local block for failed logins, the panel’s list, the optional list from the “Security level”, and manual bans. The unban removes from that union the entry matching the address you wrote. A panel network (for example 198.51.100.0/24) only leaves if you unblock 198.51.100.0, not a single IP inside that network. The unblock also applies to the optional “Security level” list (Noob, Casual, Berserk). Those IPs don’t appear in the “Blocked IPs” tab, but an unban neutralises them anyway.
The plugin reads the visitor’s IP from REMOTE_ADDR and ignores X-Forwarded-For. Behind a proxy or a CDN the address seen can be the proxy’s. In that case a block risks hitting every visitor.
Expirations work like this:
- A timed manual ban is removed when it expires, and the address leaves
.htaccessat the next check cycle, within around 15 minutes. - A local ban, the kind triggered by too many failed logins, doesn’t expire on its own. It is removed only with an unban.
- A timed unban, once it expires, brings the block back if the original source is still there.
Every time you save or remove an override, and every change to the whitelist, is written to the activity log.
Practical examples
Block IP WordPress for a day
You want to stop the address 203.0.113.5 for 24 hours. Write it in “IP address”, leave “Block (ban)”, choose “24 hours” and press “Save override”. In the “Blocked IPs” tab it will show up with the source “manual”.
Whitelist for the office network
Write 203.0.113.0/24 into the whitelist and press “Save whitelist”. From that moment the wrong logins from that network are no longer counted. Do this before testing with wrong passwords.
I’ve blocked myself
If you can still open the admin area, for example from your phone on mobile data, go to “Blocked IPs” and press “Unblock” on your IP. Then add it to the whitelist. If instead you see a 403 across the whole site, you can connect via FTP and remove the line with your IP from the .htaccess file. Be careful: the plugin can rewrite it on the next event, so as soon as you’re back in, use “Unblock” and the whitelist.
To understand more about how Apache handles these access controls, read the Apache access control guide: it explains the directives the plugin writes for you.
In short, to block IP WordPress carefully means checking the action and the address before saving. Previous chapter: General tab: block threshold and plugin status. Next chapter: Blocked IPs tab: reading the blacklist. The index is in the CSDN manual.


Leave a Reply